How to Build a Live Search using Laravel, Livewire, and Meilisearch
Last Updated on November 24, 2022
One of the most powerful features of Laravel is its ability to integrate with many different services. By default, Laravel integrates with the Meilisearch service. This allows you to easily query your data using the Laravel Eloquent ORM. But what if you want to build a custom search page? Well, it’s easy to do with a couple of tweaks. This article will show you how to create a custom search page using Laravel, Livewire, and Meilisearch.
What is Meilisearch?
Meilisearch is an open-source search engine that is built using Rust and can be integrated into any application to provide Full-Text Search. It comes with a lot of features that we can use to our advantage as developers. Because it is built using Rust, it is blazing fast making it a useful utility for any application. Laravel, through Laravel Scout, comes with an already implemented solution for meilisearch making it easy to use.
But What is Laravel Scout?
Laravel Scout is a first-party Package developed by Taylor Otwell that can be used to add Full-Text Search to your Eloquent Models. It makes it easy to search through your Eloquent Models and return the search results in a clean fashion.
Let’s get started.
How to integrate Full-Text Search into Laravel
Before we start, we need a couple of things;
- A Laravel Application
- Meilisearch Installed.
Once you have created a new Laravel Application and downloaded and installed Meilisearch, you can now follow these steps.
Install Laravel Breeze
If you have created a new Laravel Application, you can install a starter kit. I will install Laravel breeze in this tutorial.
composer require laravel/breeze We can then publish the breeze assets
php artisan breeze:install

php artisan migrate
npm install
npm run dev
Prepare Model and Migration
We now need a Model to work with. I am going to use an Article Model which will contain an article name, author name and article content
php artisan make:model Articles -mThis command will create an Article Model and its corresponding migration file.
//App/Models/Articles.php
<?php

namespace App\Models;

use Illuminate\Database\Eloquent\Factories\HasFactory;
use Illuminate\Database\Eloquent\Model;

class Articles extends Model
{
    use HasFactory;

    protected $fillable = [
        'name', 'author', 'content'
    ];
}
<?php
use Illuminate\Database\Migrations\Migration;
use Illuminate\Database\Schema\Blueprint;
use Illuminate\Support\Facades\Schema;
return new class extends Migration
{
/**
* Run the migrations.
*
* @return void
*/
public function up()
{
Schema::create('articles', function (Blueprint $table) {
$table->id();
$table->string('name');
$table->longText('content');
$table->string('author');
$table->timestamps();
});
}
/**
* Reverse the migrations.
*
* @return void
*/
public function down()
{
Schema::dropIfExists('articles');
}
};
Seed the Database
When testing, I usually use Factories and Seeders to speed up my development process. To do so, we can create an Article Factory
php artisan make:factory ArticleFactory We can use faker to seed the database and then register the factory in the Database seeder
//database/factories/ArticlesFactory.php
<?php

namespace Database\Factories;

use Illuminate\Database\Eloquent\Factories\Factory;

/**
 * @extends \Illuminate\Database\Eloquent\Factories\Factory<\App\Models\Articles>
 */
class ArticlesFactory extends Factory
{
    /**
     * Define the model's default state.
     *
     * @return array<string, mixed>
     */
    public function definition()
    {
        return [
            'name' => $this->faker->words(2, true),
            'content' => $this->faker->sentence(),
            'author' => $this->faker->name()
        ];
    }
}
//database/seeders/DatabaseSeeder.php
<?php

namespace Database\Seeders;

// use Illuminate\Database\Console\Seeds\WithoutModelEvents;

use App\Models\Articles;
use Illuminate\Database\Seeder;

class DatabaseSeeder extends Seeder
{
    /**
     * Seed the application's database.
     *
     * @return void
     */
    public function run()
    {
        Articles::factory(20)->create();
    }
}
To seed the database, db:seed command will be of help
php artisan db:seed Install and Configure Livewire
The next step is to install the livewire package. Livewire will be a major help in adding reactivity to our application.
composer require livewire/livewireWe then need to include the livewire Javascripts in the app.blade.php file in the resources/views/components folder.
...
    @livewireStyles
</head>
<body>
    ...

    @livewireScripts
</body>
</html>
Create Article Component
Livewire helps us scaffold components fast using the make:livewire command.
php artisan make:livewire ArticlesThis creates a Component which we can reuse in multiple places.
This command creates two files, one in the App/Http/Livewire Folder and another one in the resources/views/livewire folder. These two will be essential in creating our full-text search
Through laravel breeze, Laravel scaffolded authentication and a dashboard which we can now use to display the Articles.
We can fetch records from the database and display them using the Articles Component.
{{-- resources/views/dashboard.blade.php --}}
<x-app-layout>
    <x-slot name="header">
        <h2 class="font-semibold text-xl text-gray-800 leading-tight">
            {{ __('Dashboard') }}
        </h2>
    </x-slot>

    <div class="py-12">
        <div class="max-w-7xl mx-auto sm:px-6 lg:px-8">
            <div class="bg-white overflow-hidden shadow-sm sm:rounded-lg">
                <div class="p-6 bg-white border-b border-gray-200">
                   @livewire('articles'){{-- Including the Article Compontent--}}
                </div>
            </div>
        </div>
    </div>
</x-app-layout>
Install and Set up Laravel Scout
The next step is to install the Laravel scout package using composer
composer require laravel/scoutWe can then publish the configurations
php artisan vendor:publish --provider="Laravel\Scout\ScoutServiceProvider" Laravel Scout allows us to use any search driver such as database, algolia or meilisearch etc Meilisearch is a popular search engine because it is open source and can be self-hosted. It makes search easy because it handles all the technical bits such as typos.
Laravel Scout helps with all the other factors in search including indexing, updating the index and returning the results in a Laravel Friendly way. Under the hood, Scout uses Model Observers to update the records and re-index the search results in Meilisearch.
To set up Scout in our Models, we will need to include the Searchable trait in our Model
//App/Models/Articles.php
<?php

namespace App\Models;

use Illuminate\Database\Eloquent\Factories\HasFactory;
use Illuminate\Database\Eloquent\Model;
use Laravel\Scout\Searchable; //import the trait

class Articles extends Model
{
    use HasFactory;
    use Searchable; //add this trait

    protected $fillable = [
        'name', 'author', 'content'
    ];
}
We also need to install a few packages to be able to interact with meilisearch
composer require meilisearch/meilisearch-php http-interop/http-factory-guzzleWe can then set the environment variables to now use Meilisearch
SCOUT_DRIVER=meilisearch
MEILISEARCH_HOST=http://127.0.0.1:7700
MEILISEARCH_KEY=masterKey
Add Search Logic
Before performing a Search, we need to index our records in meilisearch using the scout:import command
php artisan scout:import "App\Models\Articles"Now, we can use Eloquent to perform a search on our records
We can update our Livewire Component to include the Search Logic
//App/Livewire/Articles.php
<?php

namespace App\Http\Livewire;

use App\Models\Articles as ModelsArticles;
use Livewire\Component;


class Articles extends Component
{

    public $search = '';
    public $articles;

    public function render()
    {
        if (empty($this->search)) {

            $this->articles = ModelsArticles::get();
        } else {
            $this->articles = ModelsArticles::search($this->search)->get();
        }

        return view('livewire.articles');
    }
}
Add Search Input Field
On the Articles Table, we can add a search input field that will receive the query and send it to the backend.
Livewire provides a cool way to perform data binding which we can use to our advantage. Using the wire:model property, we can pass the query onto the server and get the results back synchronously.
We can use one of the tailwind components templates to scaffold a view.
<!-- resources/view/livewire/articles.blade.php -->
<div>
     <!-- component -->
     <link rel="stylesheet" href="https://demos.creative-tim.com/notus-js/assets/styles/tailwind.css">
     <link rel="stylesheet" href="https://demos.creative-tim.com/notus-js/assets/vendor/@fortawesome/fontawesome-free/css/all.min.css">

       <section class="py-1 bg-blueGray-50">
           <div class="w-full xl:w-8/12 mb-12 xl:mb-0 px-4 mx-auto mt-24">
           <div class="relative flex flex-col min-w-0 break-words bg-white w-full mb-6 shadow-lg rounded ">
               <div class="rounded-t mb-0 px-4 py-3 border-0">
               <div class="flex flex-wrap items-center">
                   <div class="relative w-full px-4 max-w-full flex-grow flex-1">
                   <h3 class="font-semibold text-base text-blueGray-700">Articles</h3>
                   </div>
                   <div class="relative w-full px-4 max-w-full flex-grow flex-1 text-right">
                <input type="text" placeholder="Search..." wire:model="search">
                </div>
               </div>
               </div>

               <div class="block w-full overflow-x-auto">
               <table class="items-center bg-transparent w-full border-collapse ">
                   <thead>
                   <tr>
                       <th class="px-6 bg-blueGray-50 text-blueGray-500 align-middle border border-solid border-blueGray-100 py-3 text-xs uppercase border-l-0 border-r-0 whitespace-nowrap font-semibold text-left">
                                   Article name
                        </th>
                   <th class="px-6 bg-blueGray-50 text-blueGray-500 align-middle border border-solid border-blueGray-100 py-3 text-xs uppercase border-l-0 border-r-0 whitespace-nowrap font-semibold text-left">
                                   Content
                    </th>
                   <th class="px-6 bg-blueGray-50 text-blueGray-500 align-middle border border-solid border-blueGray-100 py-3 text-xs uppercase border-l-0 border-r-0 whitespace-nowrap font-semibold text-left">
                                   Author
                    </th>
                   </thead>

                   <tbody>
                        @if (!$articles->isEmpty())
                            @foreach ($articles as $article)

                                <tr>
                                    <th class="border-t-0 px-6 align-middle border-l-0 border-r-0 text-xs whitespace-nowrap p-4 text-left text-blueGray-700 ">
                                    {{$article->name}}
                                    </th>
                                    <td class="border-t-0 px-6 align-middle border-l-0 border-r-0 text-xs whitespace-nowrap p-4 ">
                                        {{$article->content}}
                                    </td>
                                    <td class="border-t-0 px-6 align-center border-l-0 border-r-0 text-xs whitespace-nowrap p-4">
                                        {{$article->author}}
                                    </td>
                                </tr>
                            @endforeach
                        @else
                            <td class="border-t-0 px-6 align-center border-l-0 border-r-0 text-xs whitespace-nowrap p-4">
                            No Results Found
                            </td>
                        @endif
                   </tbody>

               </table>
               </div>
           </div>
           </div>

       </section>
</div>
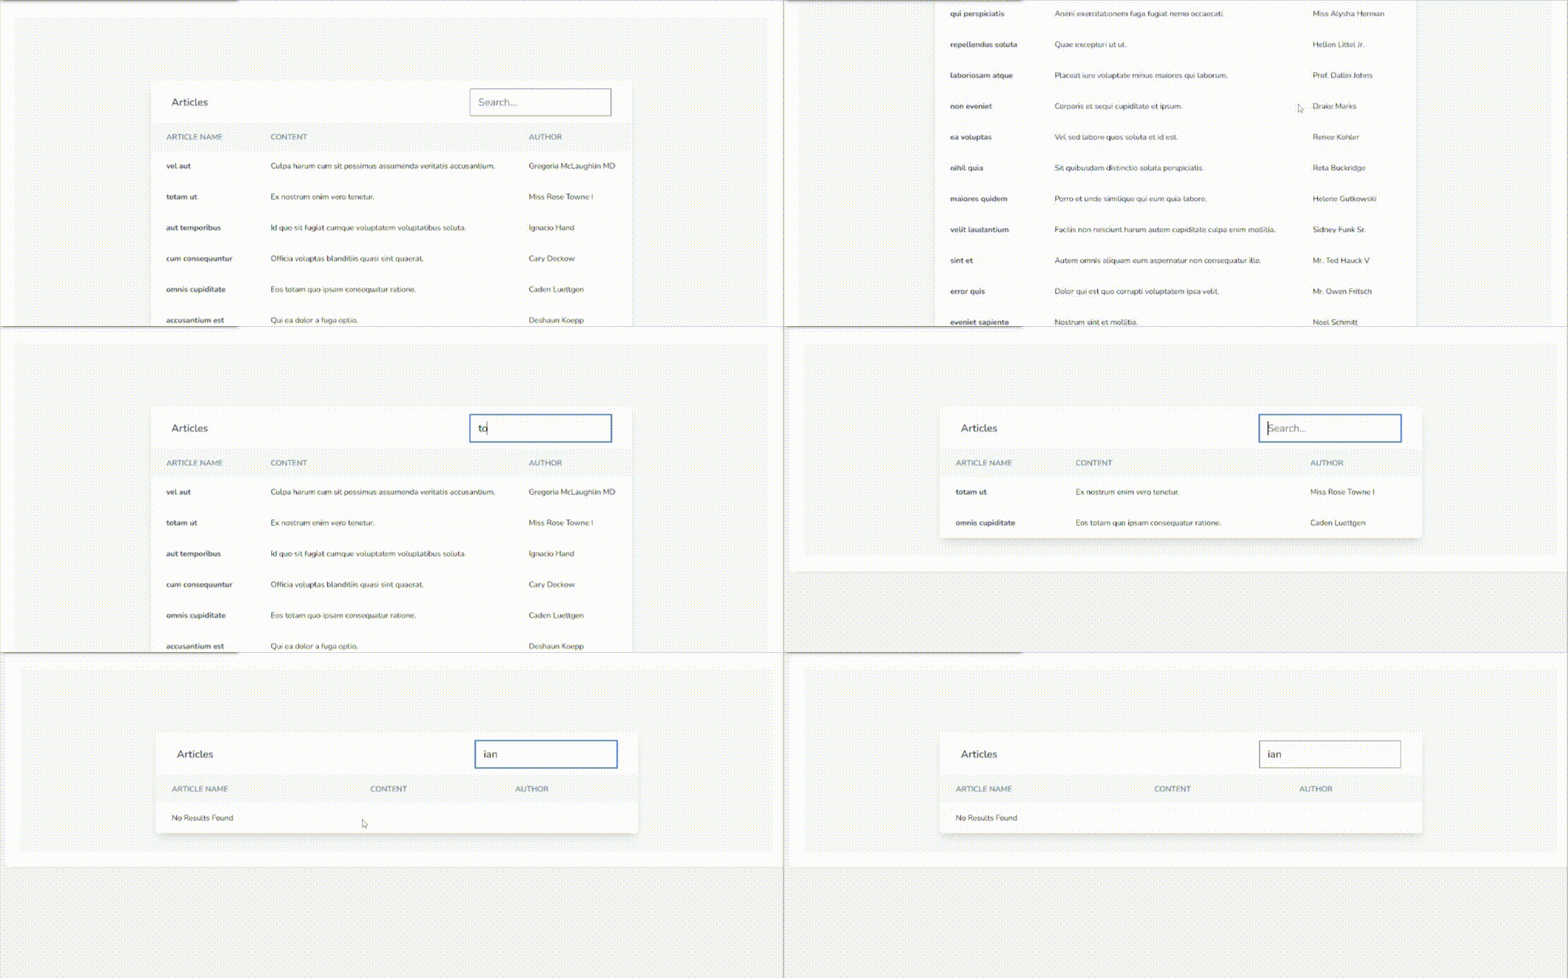
Livewire handles getting the query from the input field, makes an ajax request to the backend and returns the results back to the frontend.
This makes it easy to create a live search with minimal effort.
Display Results
Once Scout returns the results, Livewire takes care of displaying them on the table.

Conclusion
In this article, we have covered how to create a live search using Laravel Livewire and Meilisearch. We covered how to set up your application and include all the features needed for Full-Text Search. I hope this article was insightful. Thank you for reading





Please Run this Command to install breeze assets
php artisan breeze:install
Thanks for the heads up. I have updated the article to include the command