How to Add Google reCAPTCHA to Laravel Forms
Last Updated on February 6, 2023
Form submissions are an important part of many websites, but they can also be a target for spam and abuse.
Captcha is a challenge that is used to distinguish between humans and bots. These challenges can range from entering a sequence of letters in a distorted image to selecting images containing a specific item.
Google created recaptcha using these same ideas in an effort to protect websites from fraud, spam, and abuse.

Google reCAPTCHA is a free service provided by Google that helps to verify that form submissions are made by a real person and not a bot. To ensure that your Laravel forms are protected, you can add Google reCAPTCHA to your website.
In this guide, I will show you how to add Google Recaptcha to your forms in Laravel to protect your website. I will be adding the recaptcha to the login and registration form.
How to set up Recaptcha in your Laravel Project
1. Create a new laravel project.
You can create a new application or skip this step
laravel new recaptchaI will also install laravel breeze to scaffold a simple authentication system.
composer require laravel/breeze --dev
php artisan breeze:install

php artisan migrate
npm install
npm run dev
2. Add the Recaptcha script
Google provides a recaptcha script which we can add to the head
<script async src="https://www.google.com/recaptcha/api.js">I will add it to the Guest layout file generated by breeze.
// resources/views/layouts/guest.blade.php

<!DOCTYPE html>
<html lang="{{ str_replace('_', '-', app()->getLocale()) }}">
    <head>
        <meta charset="utf-8">
        <meta name="viewport" content="width=device-width, initial-scale=1">
        <meta name="csrf-token" content="{{ csrf_token() }}">

        <title>{{ config('app.name', 'Laravel') }}</title>

        <!-- Fonts -->
        <link rel="stylesheet" href="https://fonts.bunny.net/css2?family=Nunito:wght@400;600;700&display=swap">

        <!-- Scripts -->
        <script async src="https://www.google.com/recaptcha/api.js">// Add recaptcha script
        @vite(['resources/css/app.css', 'resources/js/app.js'])
    </head>
    <body class="font-sans text-gray-900 antialiased">
        <div class="min-h-screen flex flex-col sm:justify-center items-center pt-6 sm:pt-0 bg-gray-100">
            <div>
                <a href="/">
                    <x-application-logo class="w-20 h-20 fill-current text-gray-500" />
                </a>
            </div>

            <div class="w-full sm:max-w-md mt-6 px-6 py-4 bg-white shadow-md overflow-hidden sm:rounded-lg">
                {{ $slot }}
            </div>
        </div>
    </body>
</html>
3. Create a REcaptcha Admin and add a website
We can create an Admin account and then add our website.
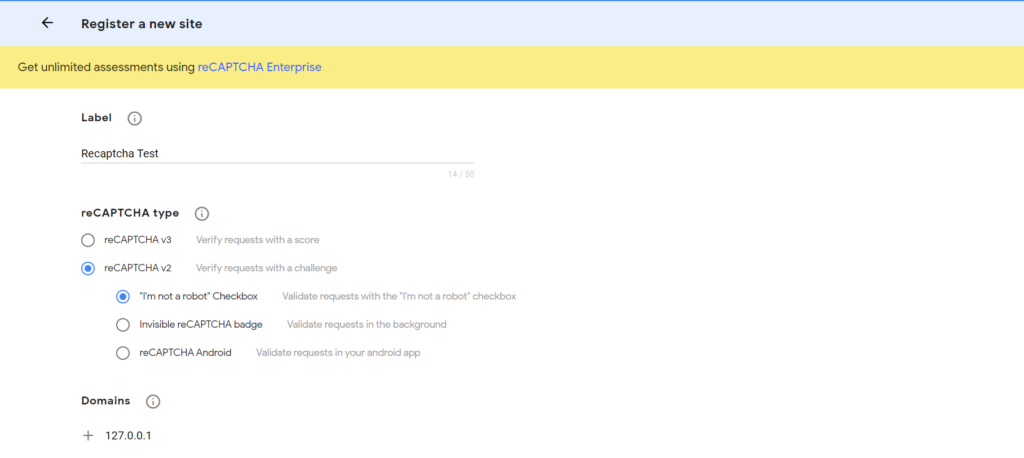
We will then need to get our site key and site secret that we will use in our Laravel application.
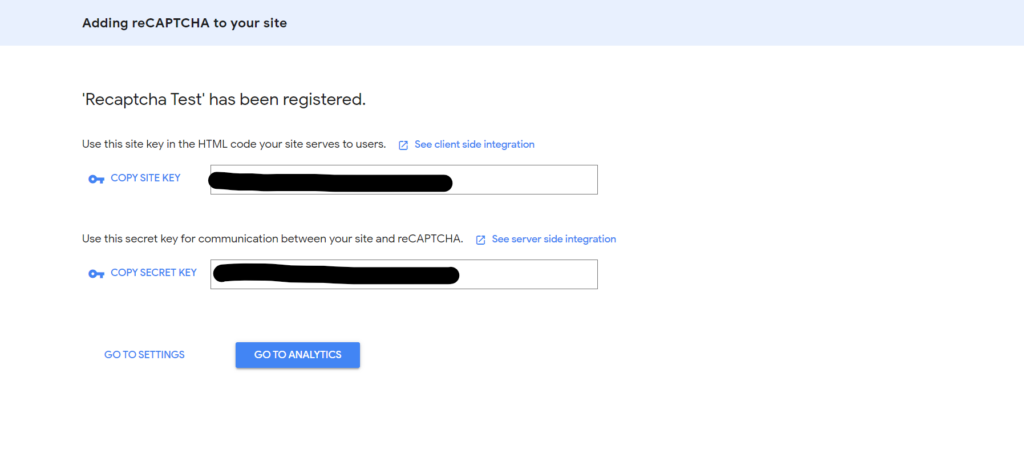
4. Update .env file and configurations
Now that we have our site key and site secret, we can add them as environment variables. We will first create a new configuration in the config/services.php file. This file is used when you want to add third-party configurations.
Always add your env configs in the configuration files and don’t call env() directly in your laravel controller. This is because laravel caches configurations and as a result uses the single config file in the bootstrap/config.php to load configuration values at runtime. By running the artisan optimize command, all your configurations are cached and used.
//config/services.php

<?php

return [

    /*
    |--------------------------------------------------------------------------
    | Third Party Services
    |--------------------------------------------------------------------------
    |
    | This file is for storing the credentials for third party services such
    | as Mailgun, Postmark, AWS and more. This file provides the de facto
    | location for this type of information, allowing packages to have
    | a conventional file to locate the various service credentials.
    |
    */

    'mailgun' => [
        'domain' => env('MAILGUN_DOMAIN'),
        'secret' => env('MAILGUN_SECRET'),
        'endpoint' => env('MAILGUN_ENDPOINT', 'api.mailgun.net'),
        'scheme' => 'https',
    ],

    'postmark' => [
        'token' => env('POSTMARK_TOKEN'),
    ],

    'ses' => [
        'key' => env('AWS_ACCESS_KEY_ID'),
        'secret' => env('AWS_SECRET_ACCESS_KEY'),
        'region' => env('AWS_DEFAULT_REGION', 'us-east-1'),
    ],
    //Add these Configurations
    'recaptcha' => [
        'key' => env('RECAPTCHA_SITE_KEY'),
        'secret' => env('RECAPTCHA_SITE_SECRET'),
    ]
];
We can then reference our configurations through the config(‘services.recaptcha’) key.
5. Add Recaptcha to your Laravel Application.
Google provides two versions of recaptcha. V2 is a challenge-based recaptcha while v3 is a score-based recaptcha. You can choose any of the two. In this tutorial, I will choose the v2 version as it is the one most people are familiar with or have interacted with across the web.
To include it, we will need to add a div containing the g-recaptcha class and your site key. We can place this div in any form we want. I will add it to the login/registration form.
// resources/views/auth/login.blade.php

<x-guest-layout>
    <!-- Session Status -->
    <x-auth-session-status class="mb-4" :status="session('status')" />

    <form method="POST" action="{{ route('login') }}">
        @csrf

        <!-- Email Address -->
        <div>
            <x-input-label for="email" :value="__('Email')" />
            <x-text-input id="email" class="block mt-1 w-full" type="email" name="email" :value="old('email')" required autofocus />
            <x-input-error :messages="$errors->get('email')" class="mt-2" />
        </div>

        <!-- Password -->
        <div class="mt-4">
            <x-input-label for="password" :value="__('Password')" />

            <x-text-input id="password" class="block mt-1 w-full"
                            type="password"
                            name="password"
                            required autocomplete="current-password" />

            <x-input-error :messages="$errors->get('password')" class="mt-2" />
        </div>

         <!-- Google Recaptcha -->
        <div class="g-recaptcha mt-4" data-sitekey={{config('services.recaptcha.key')}}></div>

        <!-- Remember Me -->
        <div class="block mt-4">
            <label for="remember_me" class="inline-flex items-center">
                <input id="remember_me" type="checkbox" class="rounded border-gray-300 text-indigo-600 shadow-sm focus:ring-indigo-500" name="remember">
                <span class="ml-2 text-sm text-gray-600">{{ __('Remember me') }}</span>
            </label>
        </div>

        <div class="flex items-center justify-end mt-4">
            @if (Route::has('password.request'))
                <a class="underline text-sm text-gray-600 hover:text-gray-900 rounded-md focus:outline-none focus:ring-2 focus:ring-offset-2 focus:ring-indigo-500" href="{{ route('password.request') }}">
                    {{ __('Forgot your password?') }}
                </a>
            @endif

            <x-primary-button class="ml-3">
                {{ __('Log in') }}
            </x-primary-button>
        </div>
    </form>
</x-guest-layout>
This will add the checkbox to the login form.

6. Validate the Response at the server level.
Whether you choose,v2 or v3 for your recaptcha, they all resolve to a single g-recaptcha-response POST parameter which we can use to verify if the user response was successful or not.
In this part, we would need our server to send an HTTP post request to google and enquire if the user response was valid or not.
We will make a request to this endpoint: https://www.google.com/recaptcha/api/siteverify
We will add the logic to the AuthenticatedSession Controller generated by laravel breeze.
//app/Http/Controllers/Auth/AuthenticatedSessionController.php

<?php

use Illuminate\Support\Facades\Http;
use Symfony\Component\HttpFoundation\IpUtils;

/**
     * Handle an incoming authentication request.
     */
    public function store(LoginRequest $request): RedirectResponse
    {
        $recaptcha_response = $request->input('g-recaptcha-response');

        if (is_null($recaptcha_response)) {
            return redirect()->back()->with('status', 'Please Complete the Recaptcha to proceed');
        }

        $url = "https://www.google.com/recaptcha/api/siteverify";

        $body = [
            'secret' => config('services.recaptcha.secret'),
            'response' => $recaptcha_response,
            'remoteip' => IpUtils::anonymize($request->ip()) //anonymize the ip to be GDPR compliant. Otherwise just pass the default ip address
        ];

        $response = Http::asForm()->post($url, $body);

        $result = json_decode($response);

        if ($response->successful() && $result->success == true) {
            $request->authenticate();

            $request->session()->regenerate();

            return redirect()->intended(RouteServiceProvider::HOME);
        } else {
            return redirect()->back()->with('status', 'Please Complete the Recaptcha Again to proceed');
        }
    }
In the code above, we are appending our site secret, the user’s IP address, and the Recaptcha response in the body and Google will return a response as to whether the user passed the recaptcha or not.
{
  "success": true|false,
  "challenge_ts": timestamp,  // timestamp of the challenge load (ISO format yyyy-MM-dd'T'HH:mm:ssZZ)
  "hostname": string,         // the hostname of the site where the reCAPTCHA was solved
  "error-codes": [...]        // optional
}
If the user did not pass the response, we may “safely” assume that they “may be” a robot, and as a result, we may redirect them back to the form where they can try and redo the captcha challenge.
On the other hand, if they pass the Recaptcha, we can process the form input and maybe store them in the database or perform further validations.
FAQS
To test Recaptcha on localhost, you will need to add the localhost domains to the list of supported domains list. You can add 127.0.0.1/ as your localhost domain name.
To run automated tests with ReCaptcha you can create a new separate site key for testing for recaptcha v3. If you are using Recaptcha v2, you can use the following test keys:
Site key: 6LeIxAcTAAAAAJcZVRqyHh71UMIEGNQ_MXjiZKhI
Secret key: 6LeIxAcTAAAAAGG-vFI1TnRWxMZNFuojJ4WifJWe
Recaptcha v2 is a challenge-based verification where a user has to interact with the Recaptcha widget in order to verify their identity.
Recaptcha v3 on the other hand is a score-based verification system that requires no interaction from the user. It also provides more data points about your traffic as compared to v2.
Depending on your needs, you can choose either of them and you will still be fine.
Recaptcha v3 is considered to be better than v2 because it is less intrusive and performs checks in the background thereby removing and interaction needed from a user.
Recaptcha v3 also uses machine learning to continually improve its ability to distinguish between human and bot traffic. Additionally, v3 being a score-based system provides you with the liberty to set a threshold for when to block or allow form submissions.
Yes, you can use the same site keys for multiple forms on the same website/application.
Conclusion
In conclusion, adding Google reCAPTCHA to your Laravel forms is an effective way to protect your website from spam and abuse. With this guide, you now have the knowledge and tools to integrate reCAPTCHA into your forms and ensure that your form submissions are made by real people. Whether you are a beginner or an experienced developer, this tutorial provides you with the step-by-step instructions you need to get started.
By taking the time to add reCAPTCHA to your forms, you can keep your website secure and focus on the important things, like building your business and connecting with your users.
Thank you for reading







This is a very informative article. Thanks for sharing this helpful article.
But how to check if v3 is working or not?
To check if recaptcha v3 is working, you will see the recaptcha badge on the bottom right of the page.